
GuidesTune the joints
Tune the joints live
Change each joint's gains and limits while the robot runs, one joint or all of them, and read back what every joint actually uses.
Each joint's drive runs its own control loops with its own gains and limits. You can change them while a session runs and see the effect at once, then read back from the boards what they actually use. The changes last for the session; the next session starts from the robot's saved settings again, so experimenting is safe.
Tune from the console
Open the Tuning page from the page menu next to the robot's name. It shares the session with Control, so you can switch back and forth while connected.
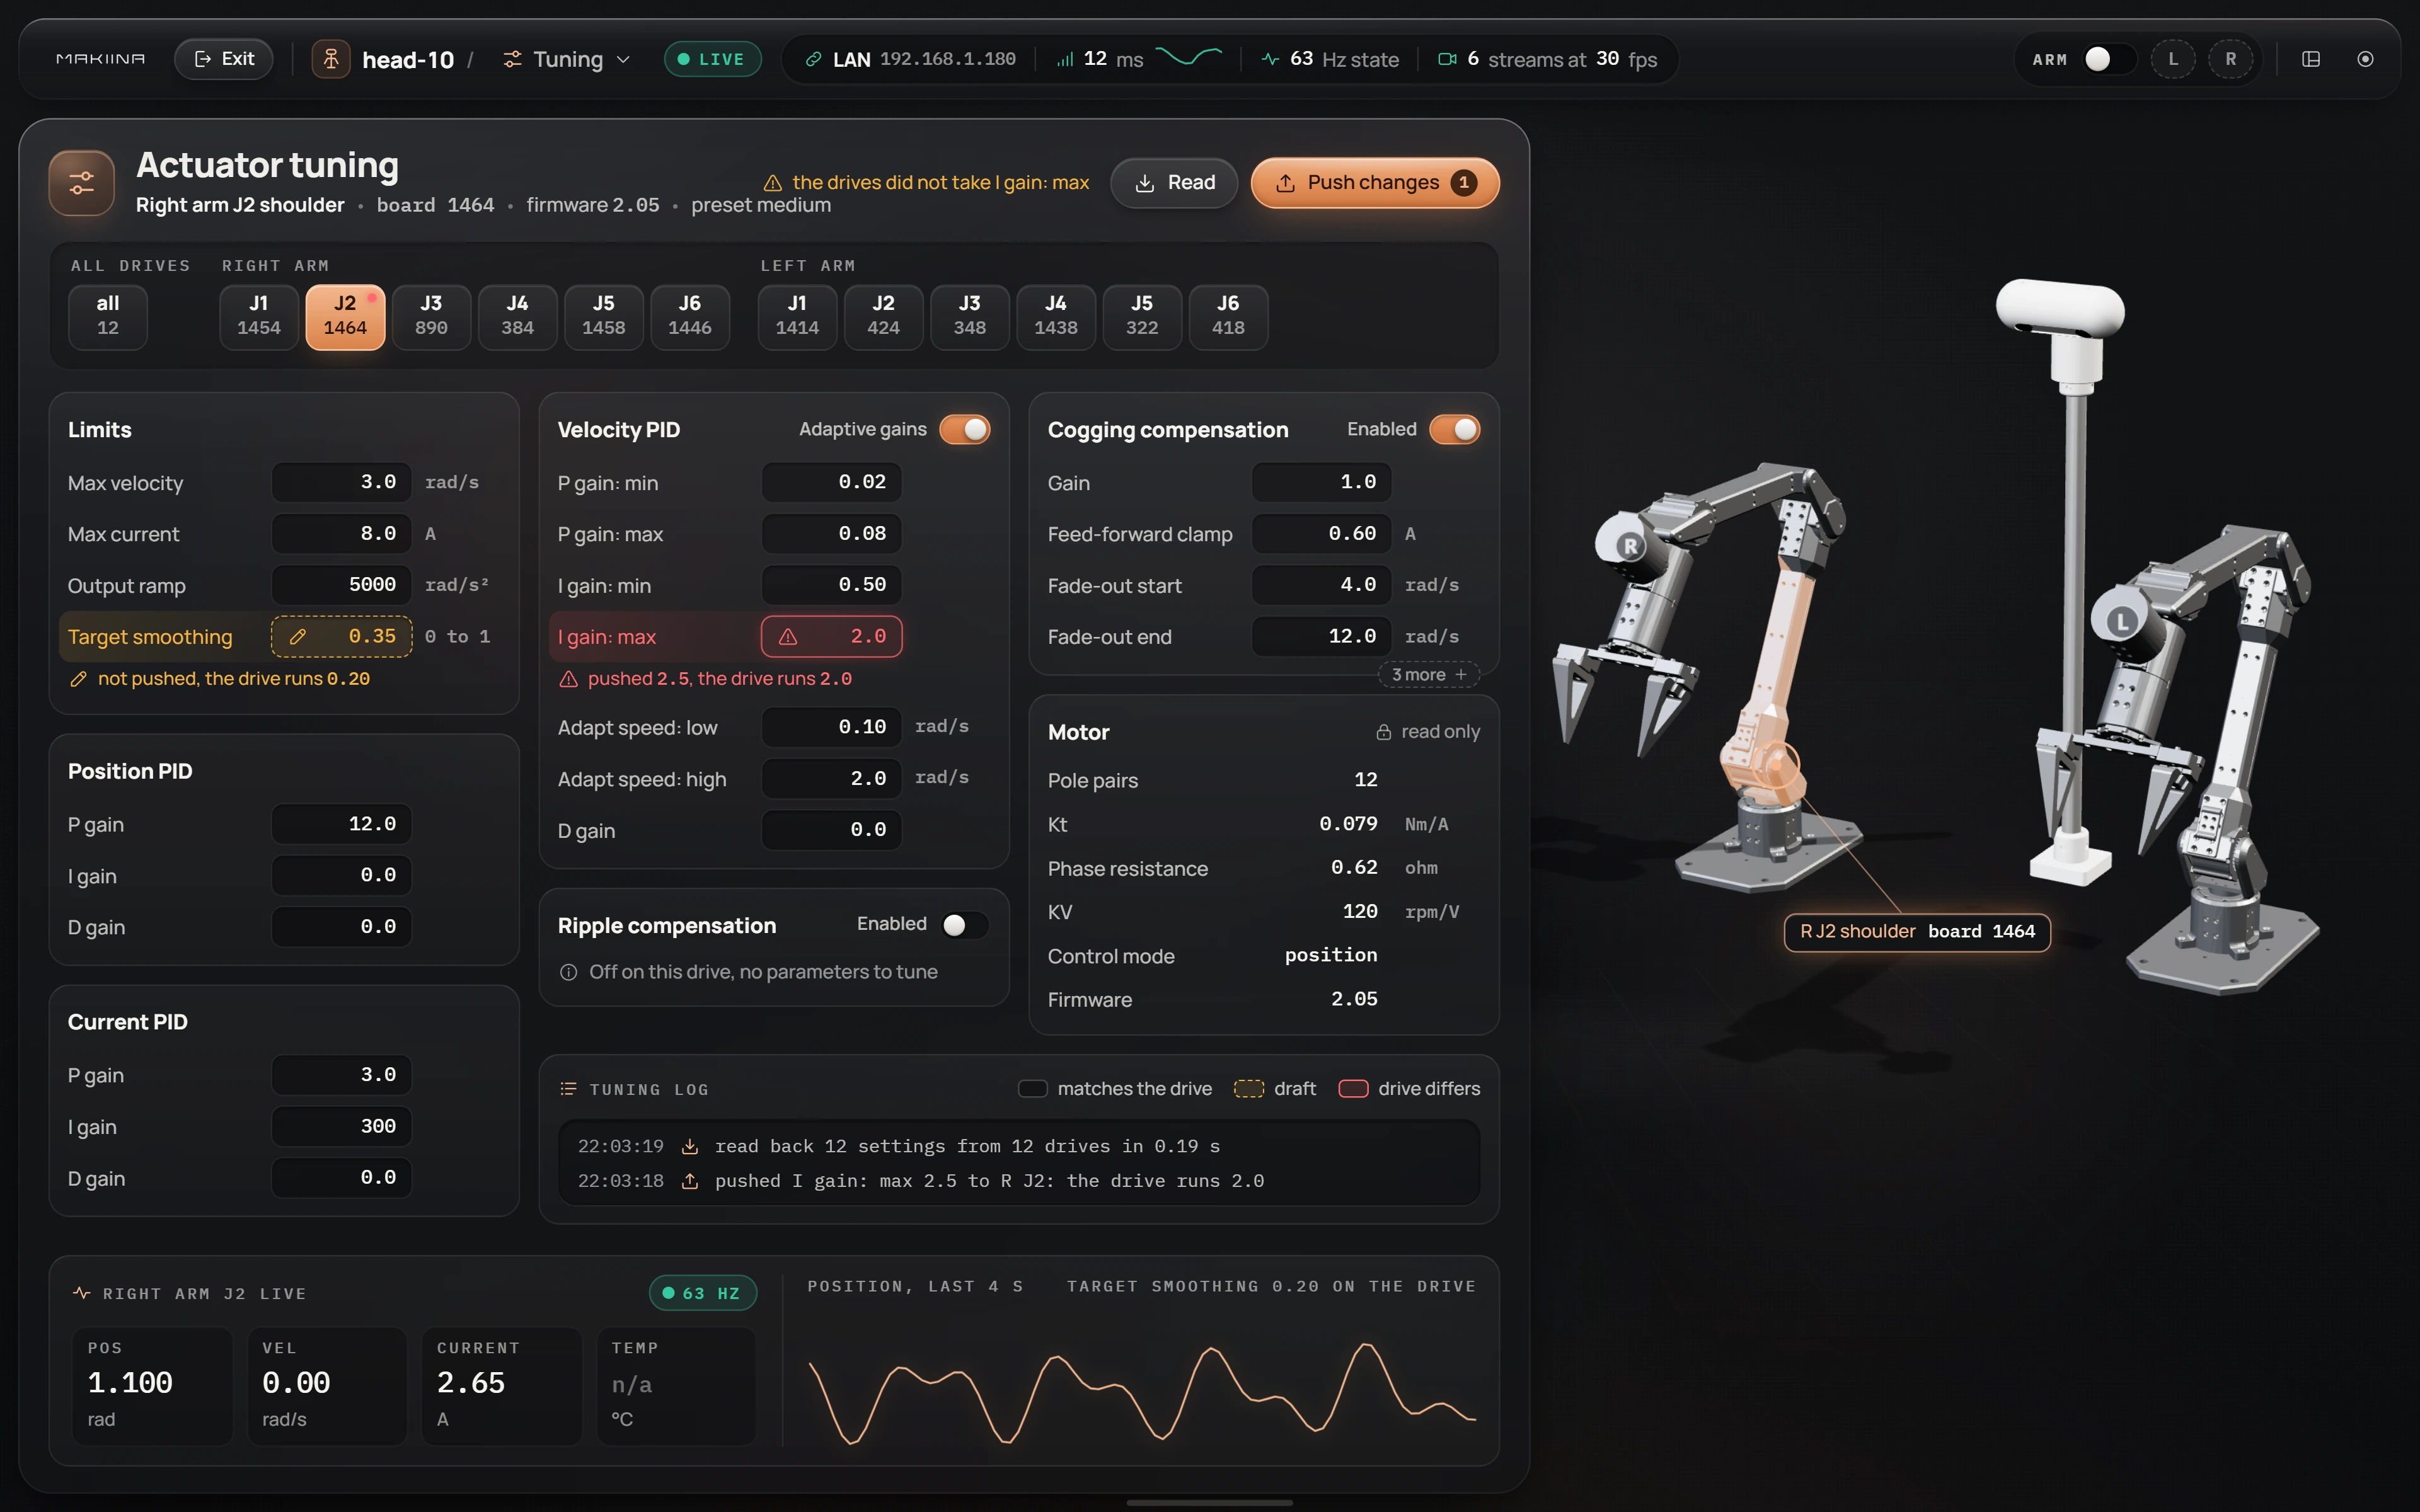
- Choose the scope with the chips at the top: all for every drive, or one joint of one arm. The header then names the joint, its board, its firmware and its motor preset.
- Type a new value. The field turns into a dashed amber draft and Push changes counts the drafts. Esc drops a draft.
- Click Push changes or press Enter. The console sends the values and then reads them back from the drives.
- A value the drive did not take is marked in red with what the drive runs instead, and the Tuning log records every push and read.
The switches on Adaptive gains, Cogging compensation and Ripple compensation flip on the drive the moment you click them. Read asks every drive for its settings again. The strip at the bottom shows the selected joint's position, velocity and current over the last four seconds, so you see the effect of a change while you make it.
Tune from Python
robot.control.set_actuator_parameters({"kp_angle": 12})              # every joint
robot.control.set_actuator_parameters({"J03-R/kp_angle": 15,          # one joint
                                       "J03-R/kd_angle": 0.2})
A plain key applies to every joint; "<joint>/<key>" applies to one. The robot applies a change within tens of milliseconds and keeps it until the session ends.
Current limits come in two sizes, because the three joints nearest the base have bigger motors than the wrist and the gripper:
robot.control.set_actuator_parameters({"max_current_big": 6.0,       # J1 to J3, A
                                       "max_current_small": 4.0})    # J4 to J6 and gripper
robot.control.set_actuator_parameters({"J01-R/max_current": 4.0})   # one joint
Read back what the drives use
params = robot.control.get_actuator_parameters()
params["J03-R"]["kp_angle"]         # 15.0
params["J03-R"]["max_current"]      # this joint's own limit, A
params["J03-R"]["firmware"]         # 2.05

robot.control.get_actuator_parameters(keys=["kp_angle", "max_current"])
Nothing is cached: the robot asks the boards, after any change you pushed has landed, so what you read is what they run. Reading only a few keys is faster. A drive with firmware older than 2.04 answers with an error entry instead of values.
What the settings do
The drive runs three loops inside each other: position around velocity around current. The current loop runs at 14 kHz inside the motor controller.
| Group | Keys | What they change |
|---|---|---|
| Limits | max_velocity, max_current, output_ramp, position_filter_amount | how fast the drive may turn, how much current it may use, how quickly its output may change, and how much it smooths incoming targets (0 raw, up to 1) |
| Position PID | kp_angle, ki_angle, kd_angle | stiffness around the target; higher kp_angle tracks tighter but overshoots and buzzes sooner |
| Velocity PID | adaptive_vpid_enabled, adaptive_vpid_p_min, adaptive_vpid_p_max, adaptive_vpid_i_min, adaptive_vpid_i_max, adaptive_vpid_vel_min, adaptive_vpid_vel_max, kp_velocity, ki_velocity, kd_velocity | damping; with adaptive gains on, the drive uses the max gains near standstill for a firm hold and the min gains at speed for smooth motion, blending between the two speeds |
| Current PID | kp_current, ki_current, kd_current | the innermost loop; rarely worth changing |
| Cogging compensation | cogging_enabled, cogging_gain, cogging_max_iq_ff, cogging_fade_start, cogging_fade_end and three finer ones | cancels the motor's magnetic detents at low speed, fading out as speed rises |
| Ripple compensation | ripple_enabled and its gains | cancels torque ripple from the gearbox |
The Motor group on the Tuning page (pole pairs, torque constant, phase resistance, KV, control mode, firmware) is read only.
Tune safely
- Change one thing at a time, and watch the live strip or the telemetry.
- Keep the torque fraction low while you experiment. The robot-side safety limits (
robot.safety) stay in force whatever the drives are set to. - A value that looks ignored may have been clamped by the drive; read it back to see what it runs.
- To keep settings for good, they belong in the robot's
actuators.toml(Console, CLI and environment). Until then every session starts from the saved values.